
This guide shows how to find the data needed to connect Facebook and Instagram contact forms (Lead Ads) with the voxCRM system. All you need to do is collect four pieces of data and send them to our support team - we configure the connection in the system settings, and the integration starts retrieving submissions (leads). There is no need to install anything or have any programming knowledge; all steps are performed in the Facebook panel (https://business.facebook.com/business/loginpage), and the whole process takes about 15 minutes.
Table of contents
- What we need
- Connection name
- Page ID - page identifier
- Page Access Token - access to the list of forms
4.1 Extending the validity of the Page Access Token - System User Token - retrieving leads
- Sending the data to the support team
- Tips and security
- Contact
1. What we need
Four pieces of data are needed to configure the integration. The table below shows what each of them is used for.
The data below can be obtained by logging in to your Facebook panel - https://business.facebook.com/business/loginpage
| # | Data item | Purpose |
| 1 | Name | Any connection name - allows it to be recognized in the system E.g.: "Facebook - Sunny Estate" or "Lead Ads - company page" |
| 2 | Page ID (page identifier) | Identifies the Facebook page |
| 3 | Page Access Token | Allows retrieving the list of forms |
| 4 | System User Token | Allows retrieving leads from the forms |
2. Connection name
This is any label of your choosing - it is used only to recognize this connection in our system.
Examples: "Facebook - Sunny Estate" or "Lead Ads - company page". Simply provide a name that will be clear and easy to recognize.
3. Page ID - page identifier
This is the identification number of the Facebook page. To find it, you need to:
- Go to https://business.facebook.com/latest/settings (Settings).

- In the menu on the left, select Accounts, then Pages.
- Click your page - its identifier (Page ID, a string of digits) will be displayed under the name. Copy this number.

4. Page Access Token - access to the list of forms
This token allows us to read the list of contact forms. It must be a token of the "Page" type. It is generated in the Meta for Developers tool. (Guide for creating an account if one does not exist - Creating a Meta app and an access token for importing leads in voxCRM)
- Go to https://developers.facebook.com/tools/explorer/
- In the Meta App field, select your app.
- Expand User or Page, click Get User Access Token and select the following set of permissions (the
leads_retrievalpermission can be found in the Other section),pages_show_listpages_read_engagementpages_manage_metadatapages_manage_adsleads_retrievalbusiness_managementads_read - Click Generate Access Token - log in and confirm.
- Expand User or Page again and in the Page Access Tokens section click your Page.
- The Page token will appear in the Access Token field - copy it. This is the Page Access Token.

leads_retrieval permission, this single token can handle both forms and leads - in that case a separate System User Token (section 5) is not necessary. If this sounds complicated, simply send us both tokens from sections 4 and 5.4.1 Extending the validity of the Page Access Token
A Page Access Token generated this way usually has a short validity period - it may expire after as little as an hour. That is why it is worth extending its validity before sending it to us. This is done in the Access Token Debugger tool:
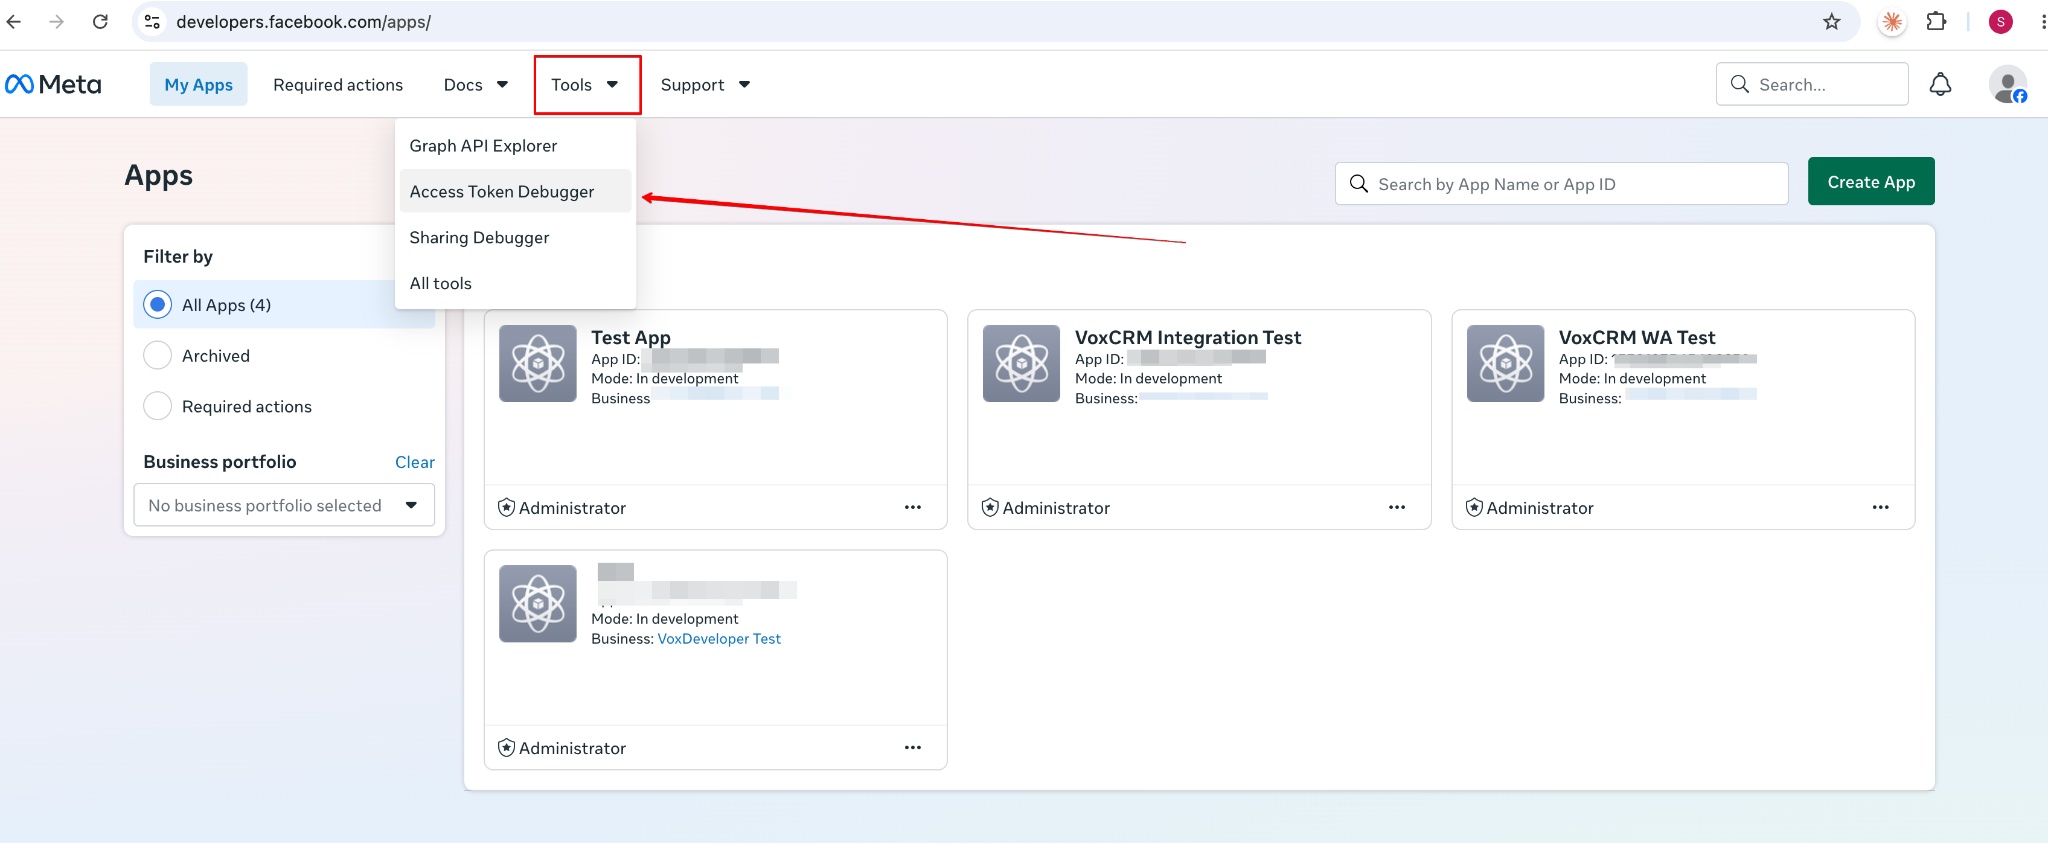
- Go to https://developers.facebook.com/apps/ - the panel where the app was created - and in the top Tools menu select Access Token Debugger.
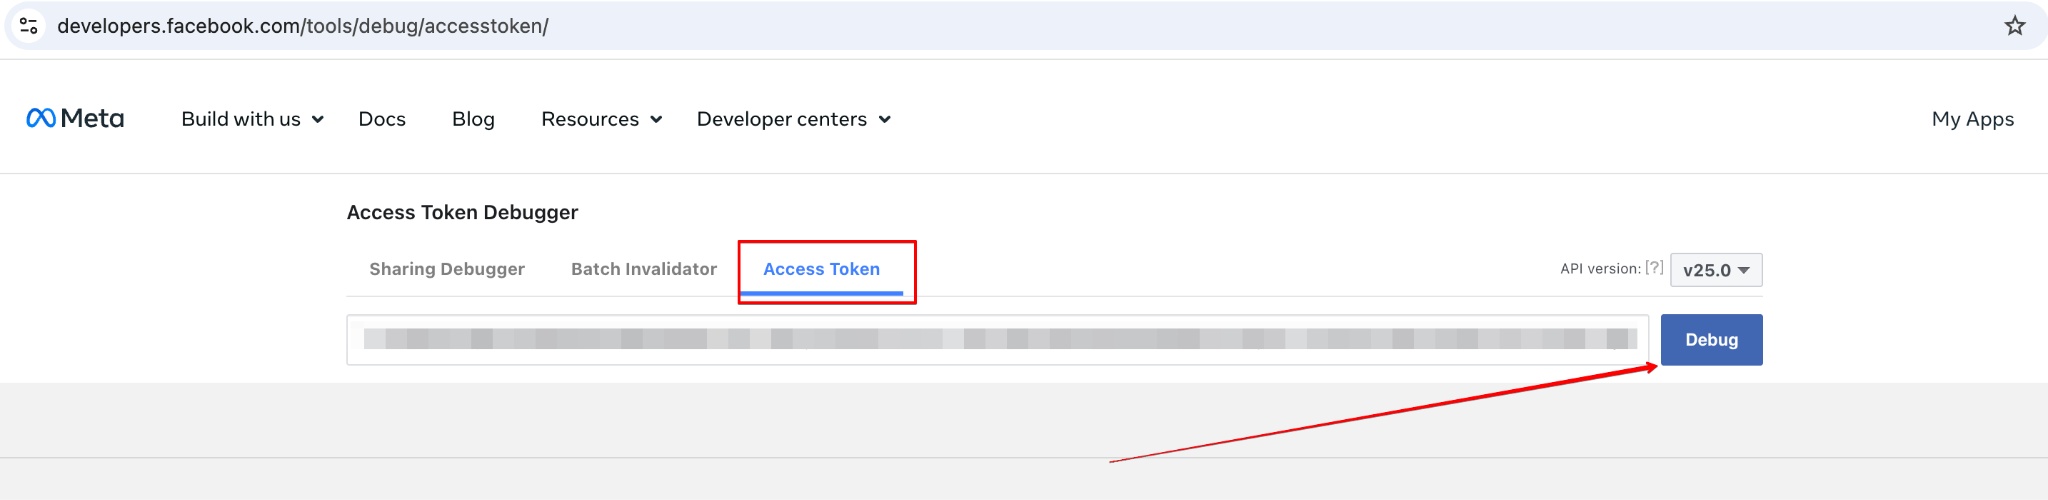
- Paste the previously generated token into the field and click Debug
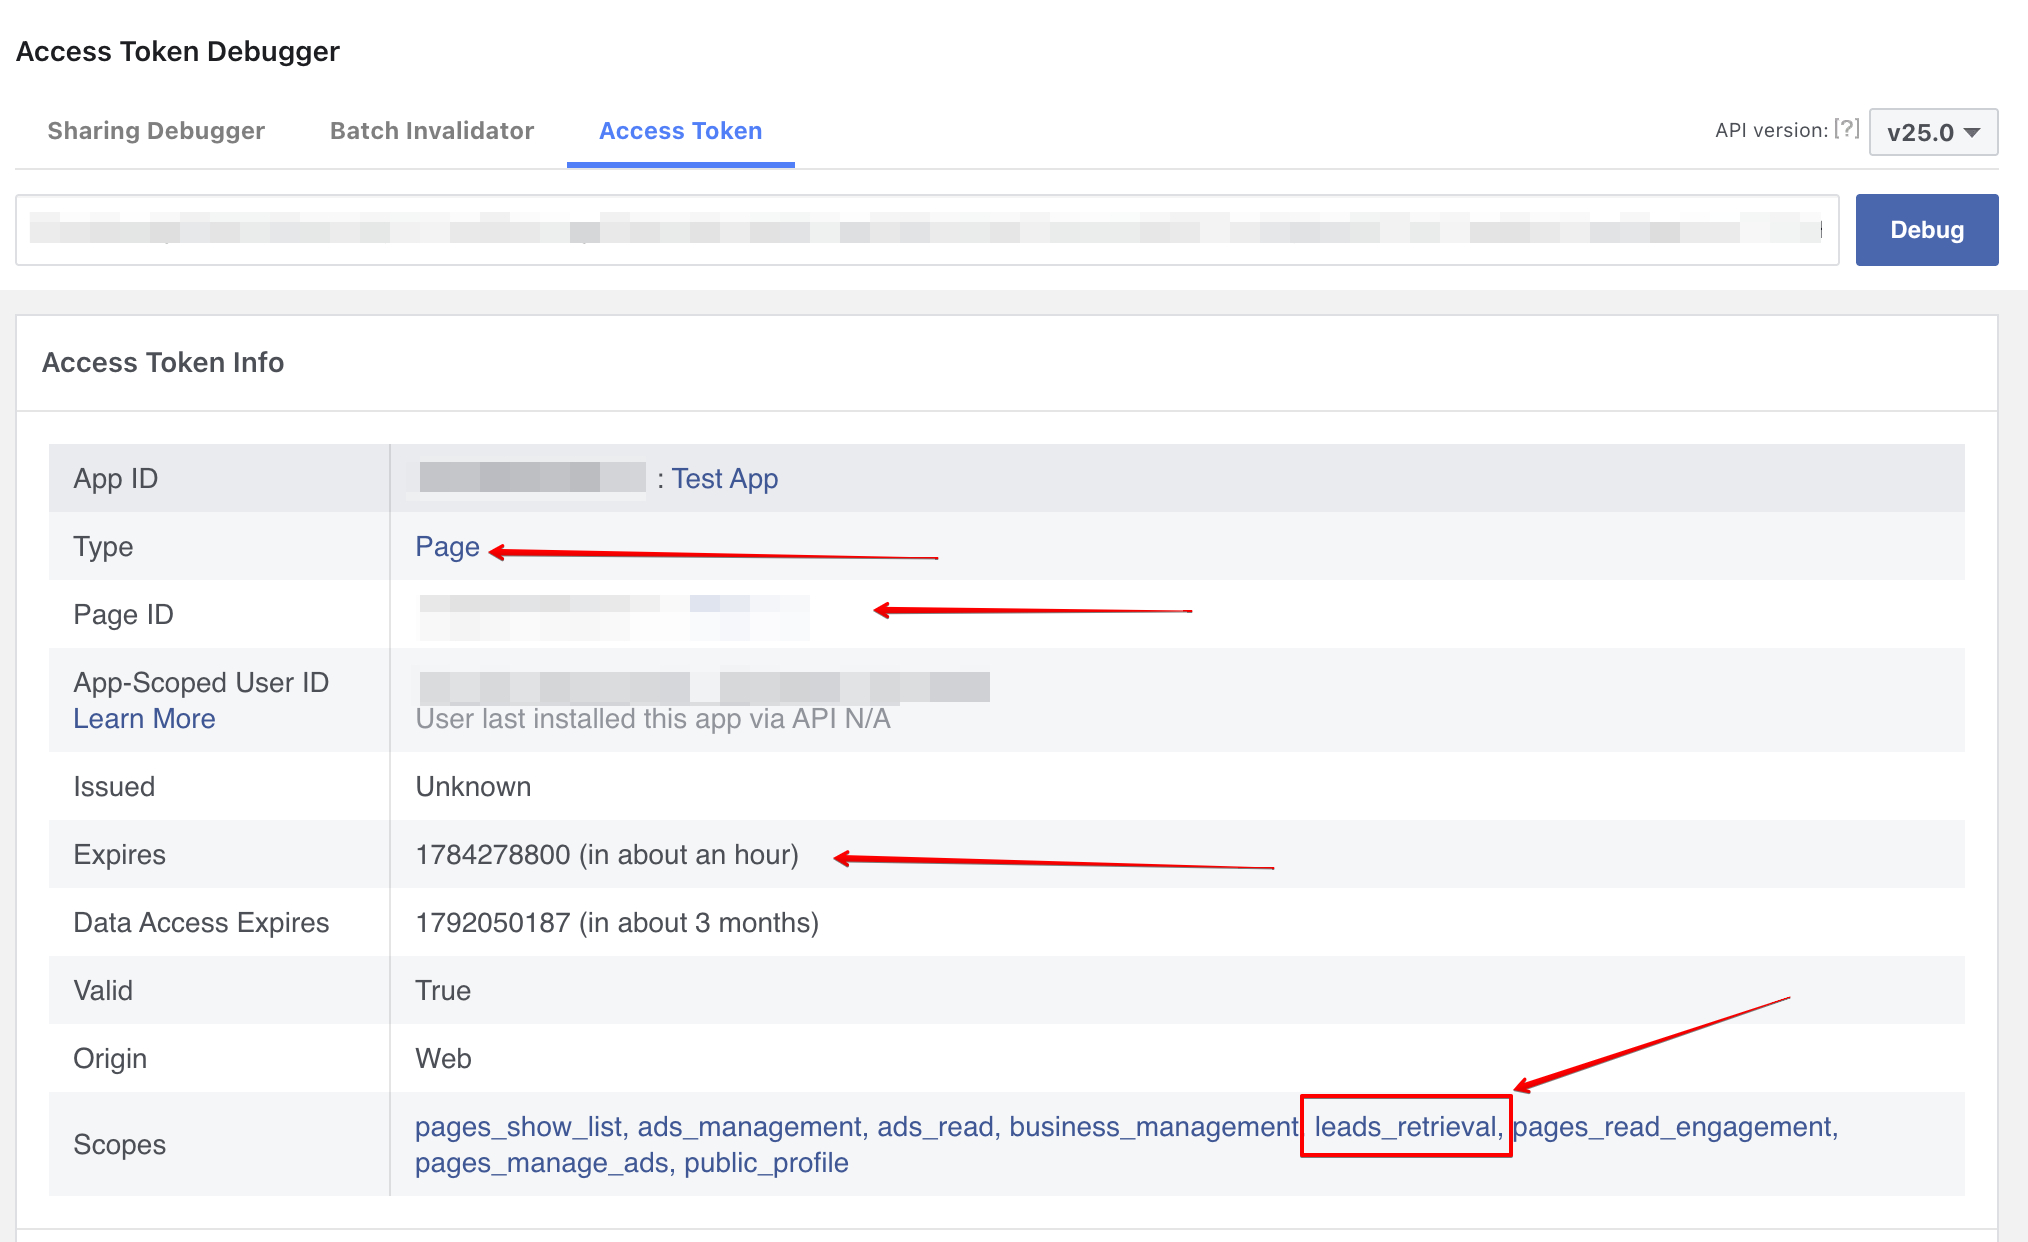
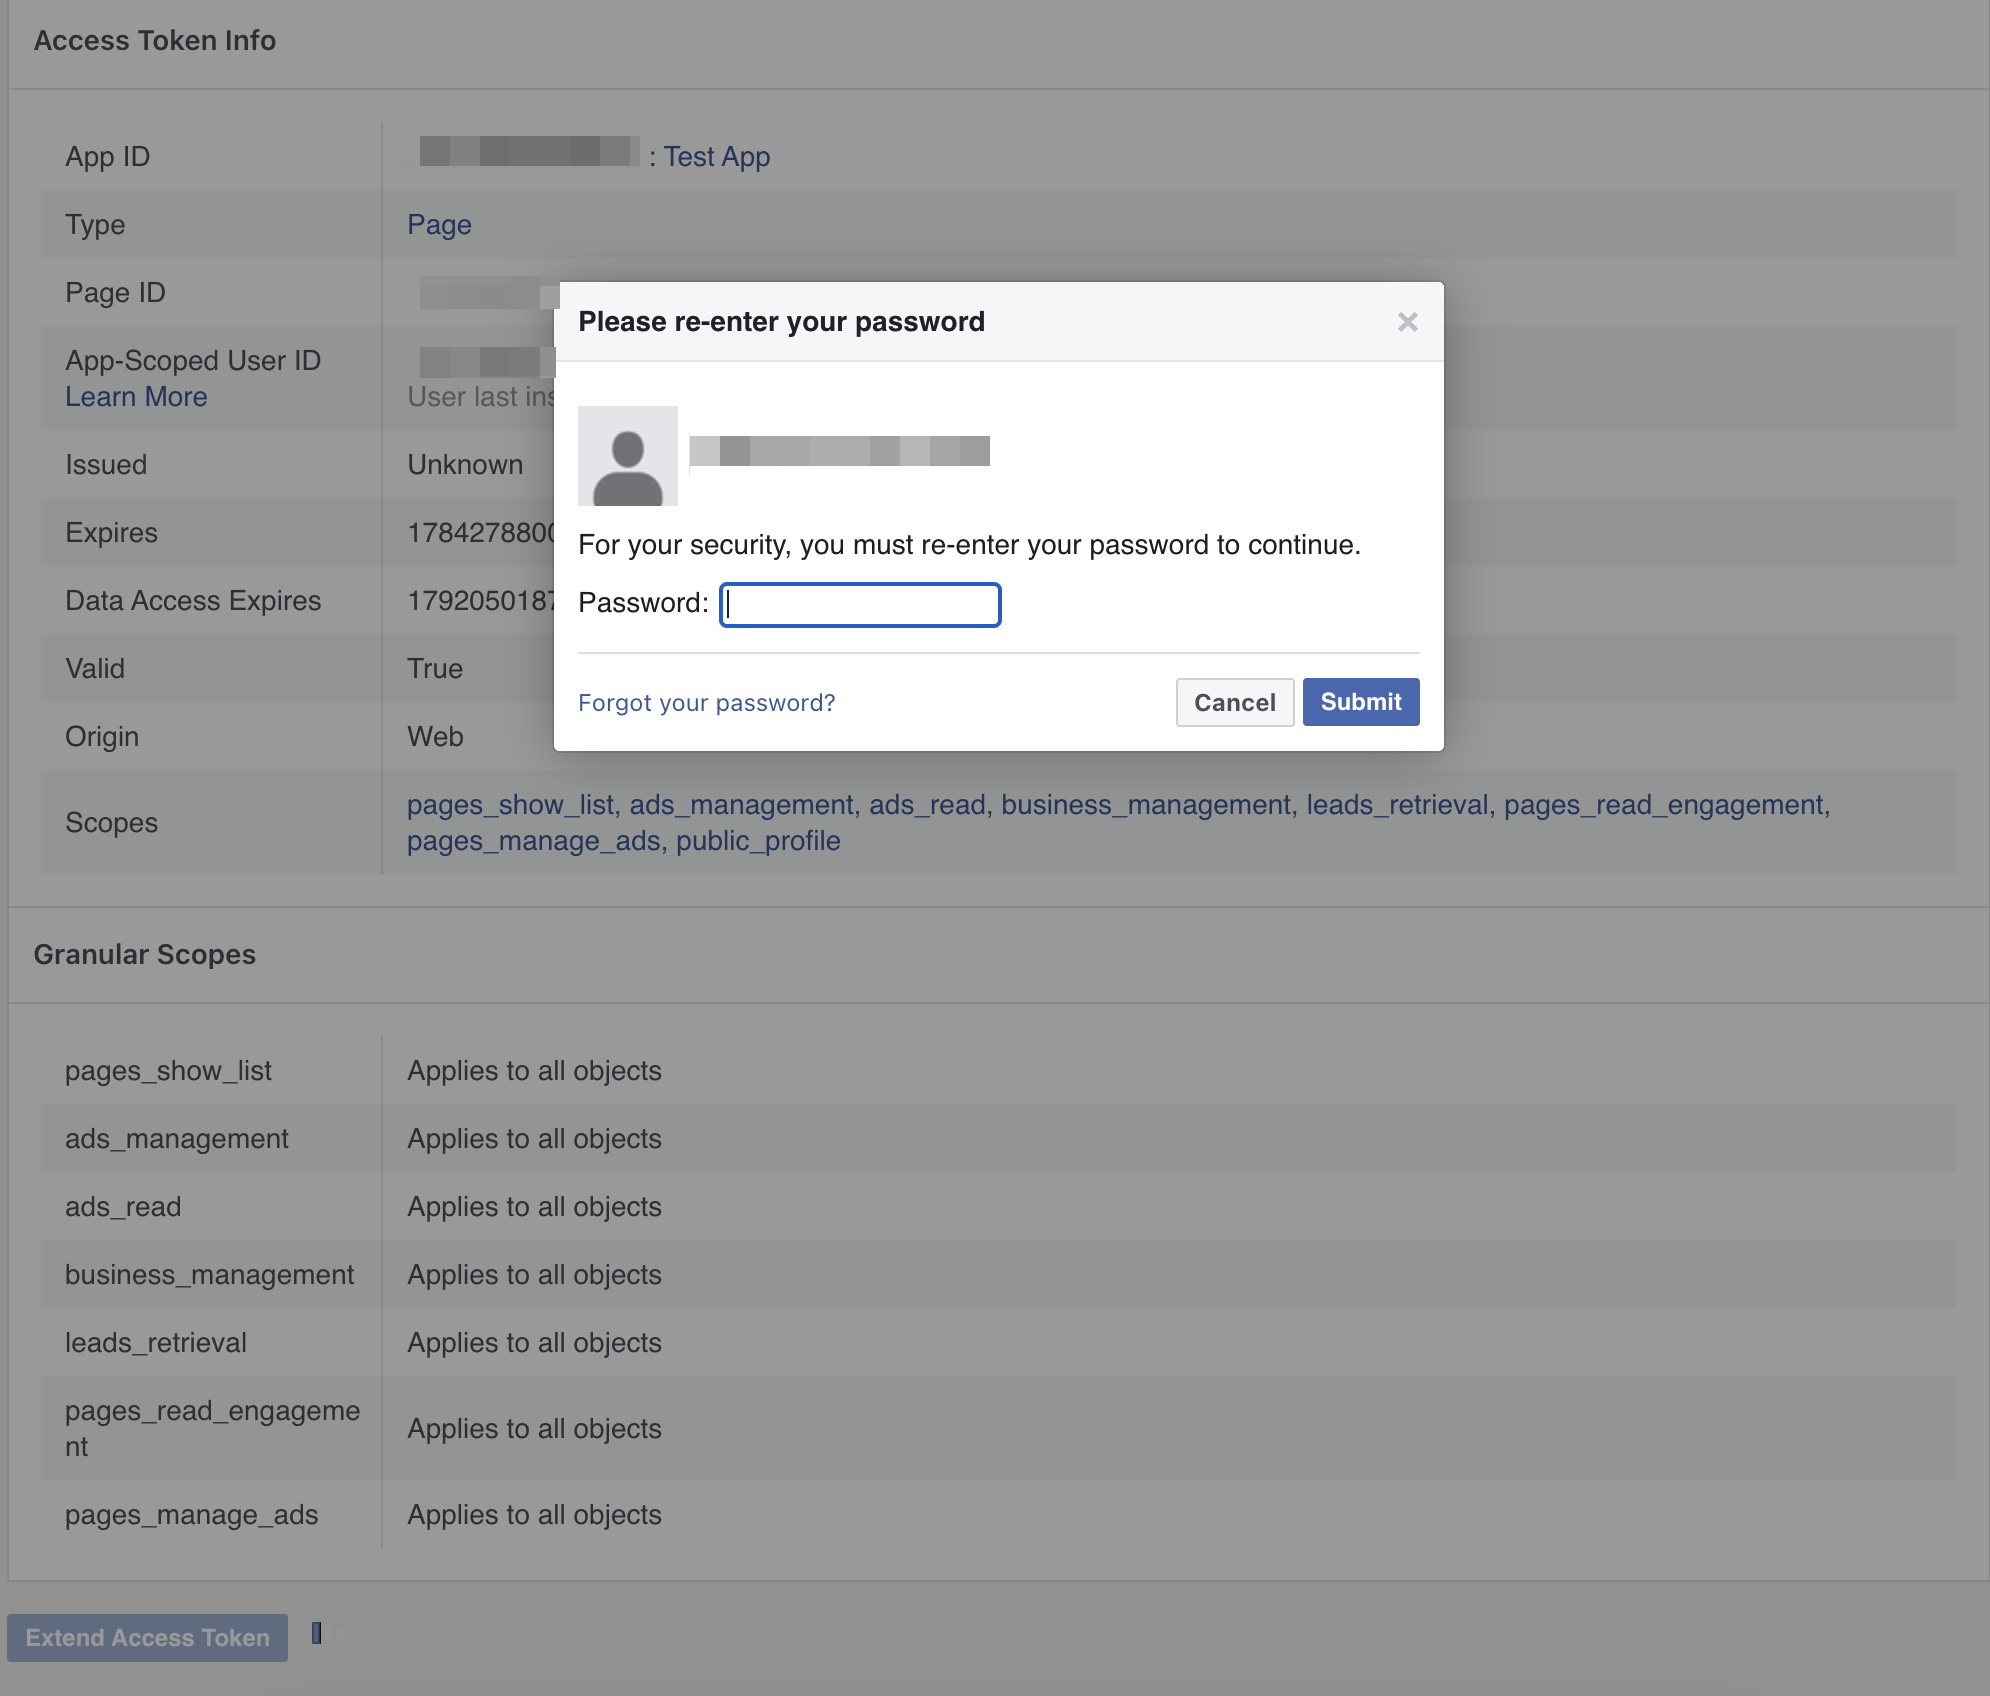
- Information about the token will be displayed. It is worth checking whether the Type field shows Page (the token is linked to the Page from which the forms are retrieved), whether Page ID indicates the correct page, and whether the list of permissions (Scopes) includes leads_retrieval. The Expires field shows when the token will expire.
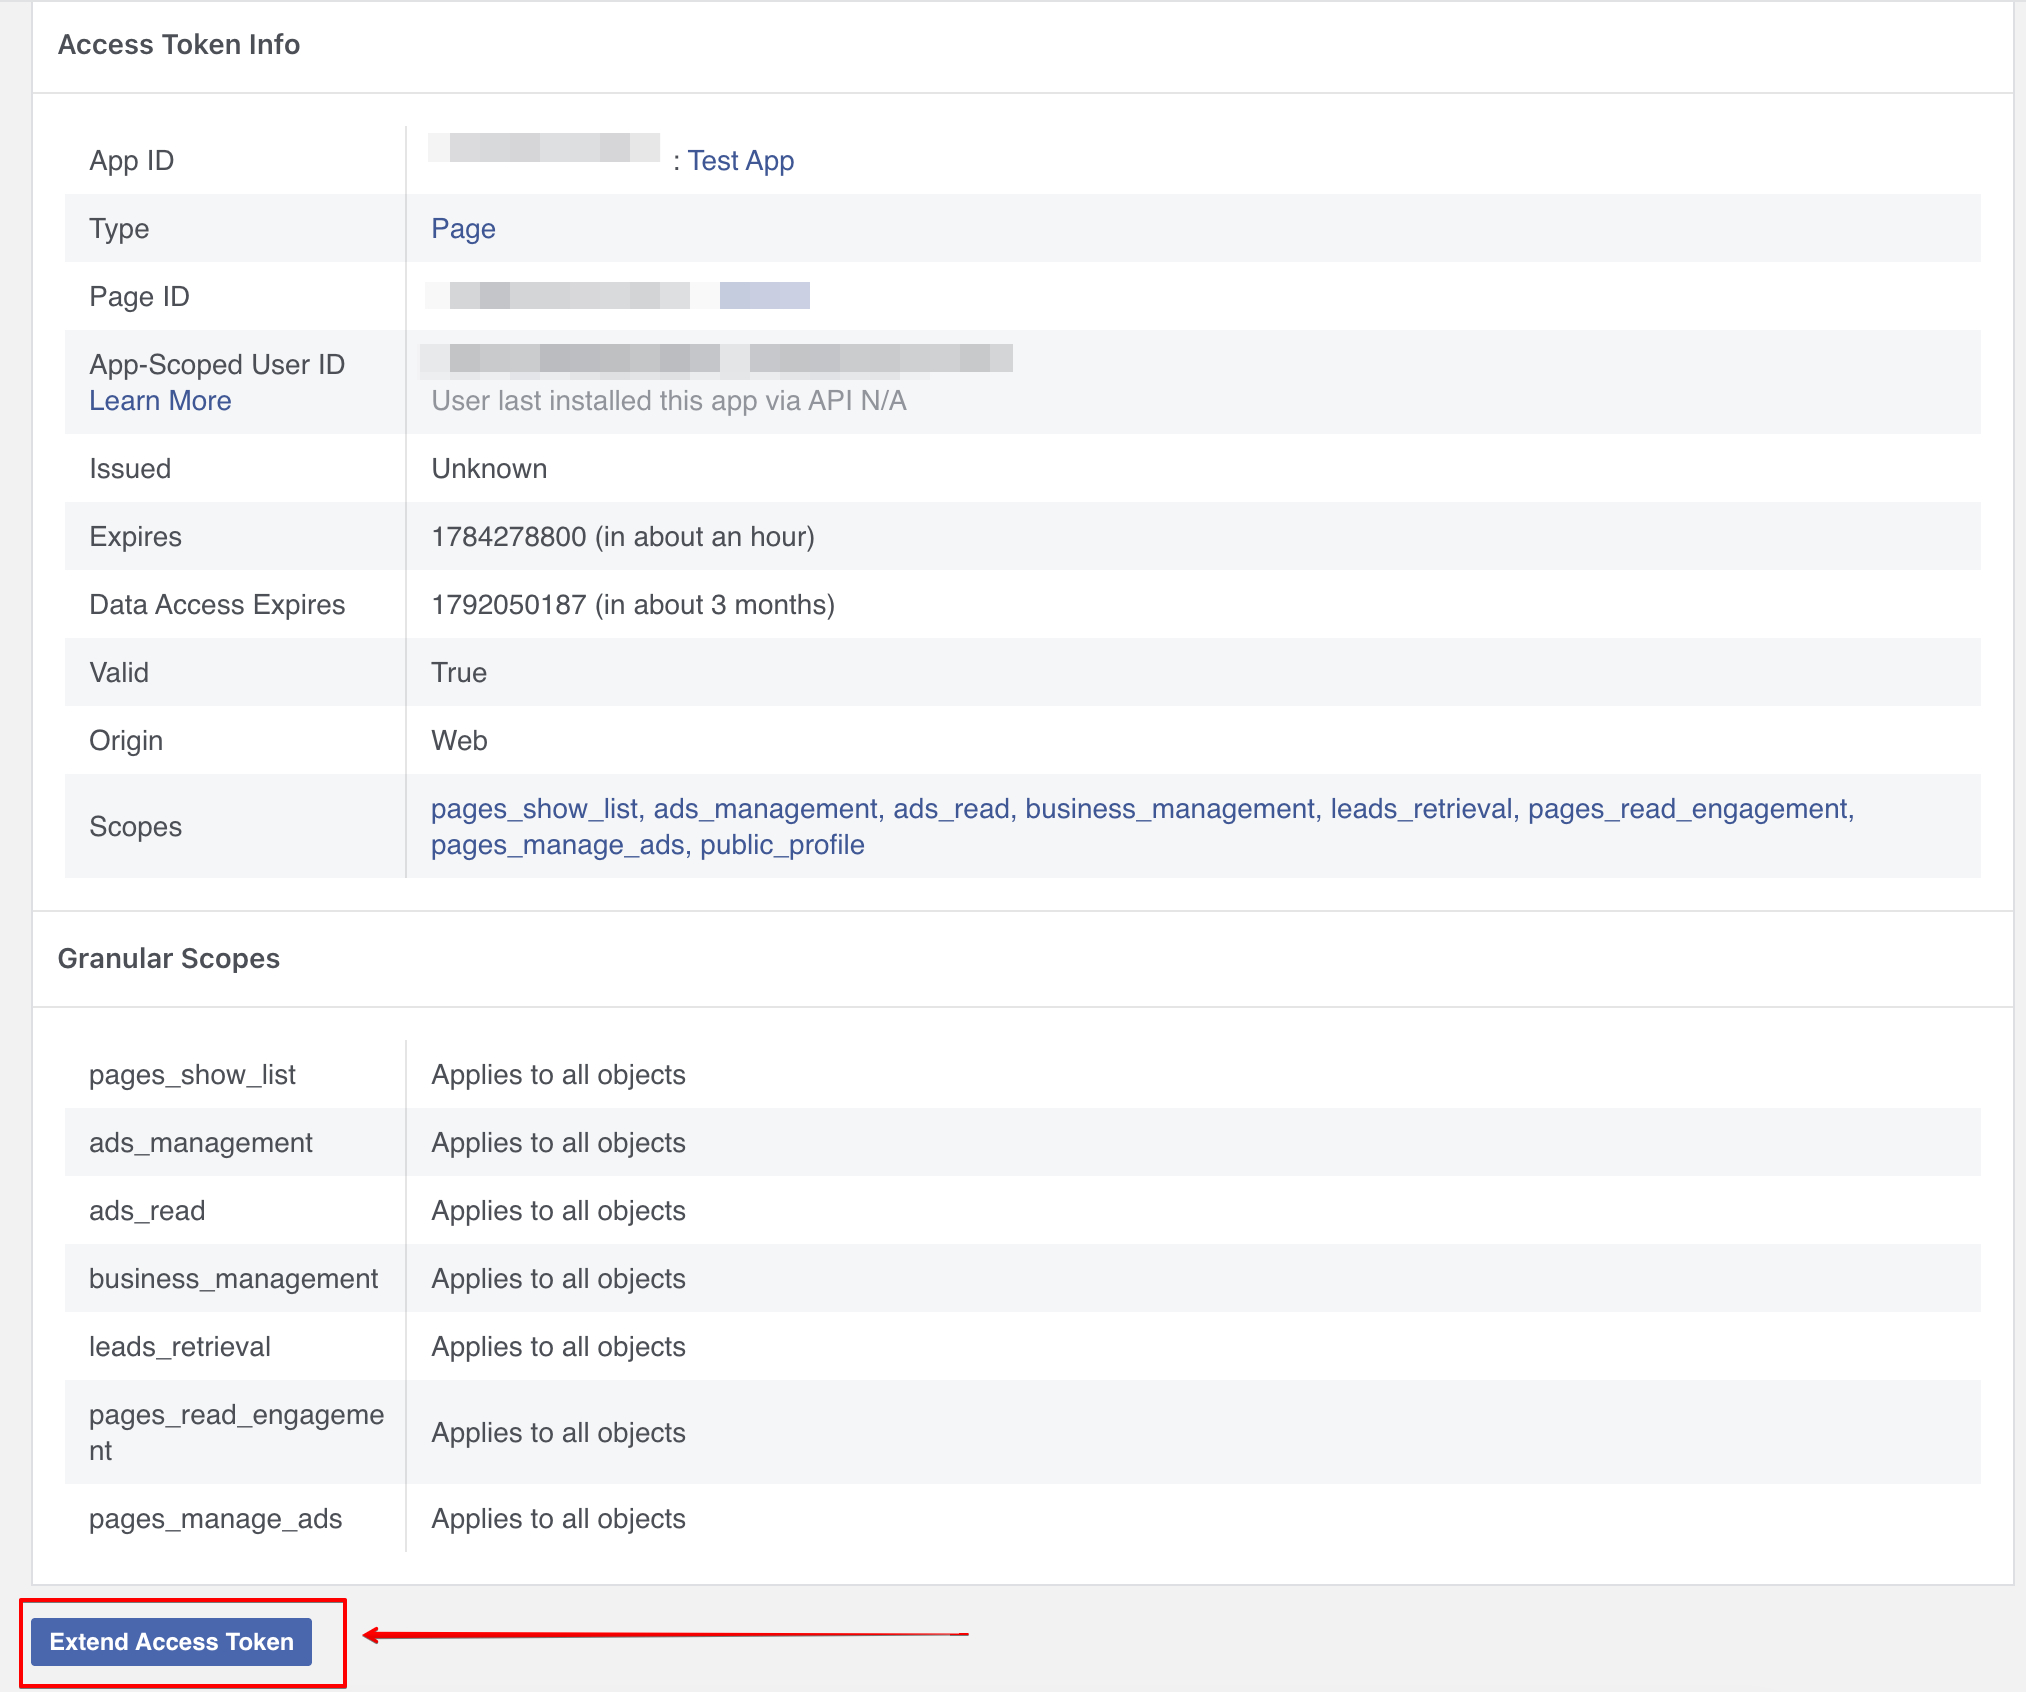
- Scroll to the bottom of the page and click the Extend Access Token button.
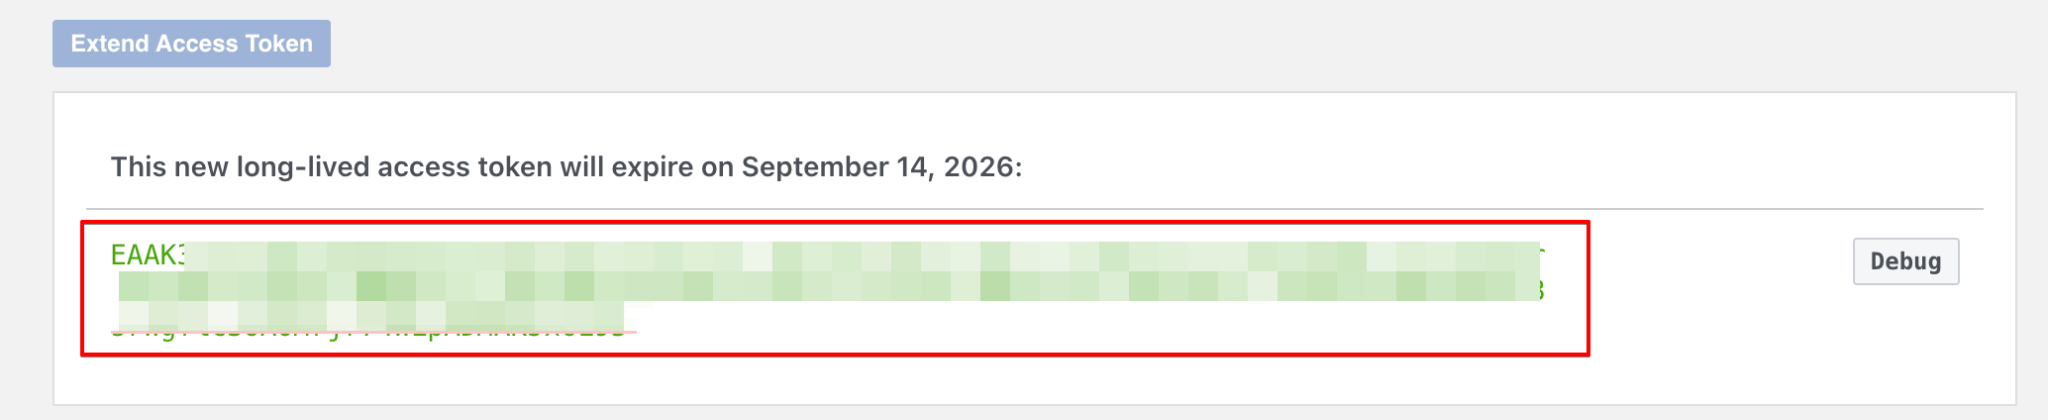
- Facebook will ask you to re-enter your Meta account password - after entering it, a new token with a much longer validity period will be displayed.
- Copy the new token and send it to our support team - this is the Page Access Token with extended validity.
5. System User Token - retrieving leads
This token allows retrieving submissions (leads) from the forms - it is needed in case the previous token does not have the required permissions. It is generated via a System User in Business Manager. A token created this way does not expire - the whole operation is performed only once.
Step 5.1 - Opening the list of system users
In Business Manager: Settings → Users → System users (direct address: https://business.facebook.com/settings/system-users).

Step 5.2 - One-time acceptance of the policies
On first entry, Facebook will ask you to accept the Non-Discrimination Policy. This is a one-time formality - simply click I Accept.

Step 5.3 - Creating a system user (if one does not exist)
If a system user already exists on the list - it can be used; go straight to step 5.4. If not, you need to:
- Click + Add in the top right corner.
- Enter any name (e.g. voxCRM Lead Ads).
- Select the role: Admin.
- Click Create system user.

Step 5.4 - Assigning the app and the page to the user
In the user details, click Assign assets. TWO assets need to be assigned, both with the Full control option:
- Apps - select your app.
- Pages - select your page (enable access to leads / Manage leads).
Then click Assign assets.


Step 5.5 - Generating the token
In the top right corner of the user details, click Generate token.

Step 5.6 - Selecting the permissions
In the token generation window, set Expiration: Never and select the entire set of permissions below:
| Permission | What it is used for |
leads_retrieval |
Retrieving leads (Lead Ads) - essential |
pages_show_list |
List of pages |
pages_read_engagement |
Reading page activity |
pages_manage_metadata |
Linking the page with the forms |
pages_manage_ads |
Access to the page's ad forms |
business_management |
Managing business assets |

Step 5.7 - Copying the token
Facebook will show the token only once. Click Copy and save it in a secure place.

6. Sending the data to the support team
Please send the collected data to our support team's address in a single message, in the following format:
7. Tips and security
- BOTH tokens are needed: the Page Access Token to read the list of forms, the System User Token to retrieve leads from them.
- Complete asset assignment: for the System User, both the App and the Page must be assigned (step 5.4), and the full set of permissions must be selected, especially
leads_retrieval. - Token validity: the System User Token does not expire. The Page Access Token tends to be valid for a limited time - if form synchronization stops working, please send us a new one.
- Treat the token like a password: the token should not be shared in public places. Sending it to our support team is safe.
- The correct business and page: in the top right corner of the Facebook panels, it is worth making sure that the correct business and page are selected, not a private account.
- Do not delete the app or the system user in Meta - the integration uses them on an ongoing basis.
8. Contact
If you have any questions or problems, please contact the support team:
- E-mail: kontakt@voxcommerce.pl
- Phone: 534 571 638